Te- och ljuskort med tutorial
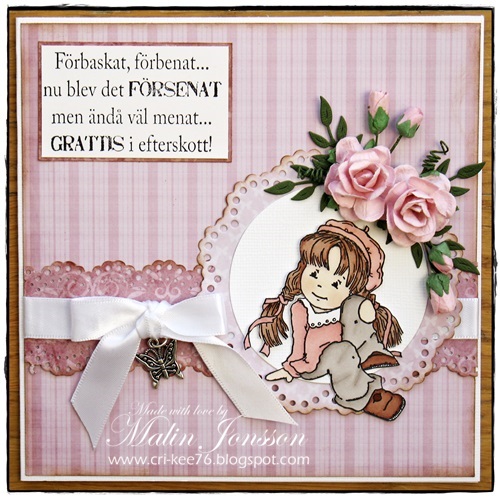
Jag har gjort ett te- och ljuskort efter den fina skissen som Lotta ritat till utmaning #53 hos 100 % Norr. Jag har använt två turkosa detaljer. En stor turkos blingsten i min hemmagjorda blomma och en turkos pärla i min hemmagjorda pins. Jag tog mig friheten att göra en riktigt fri tolkning denna gång. De tre cirklarna i skissen är min blomma med tre lager. Texten "kram" kommer från Stämpelkällan och jag valde att flytta ner den till hörnet och blommans center får motsvara bilden denna gång. Jag har ett band i mitten men det mesta är dolt utav det mönstrade papperet.
I've made a tea light card after the fine sketch Lotta designed to challenge # 53 at 100% North. I have used two turquoise details. A large turquoise bling stone in my home-made flower and a turquoise bead in my homemade pins. I took the liberty to make a really free interpretation this time. The three circles in the sketch is my flower with three layers. The text "hug" is from Stämpelkällan and I chose to move it down to the corner and the flower centers must meet the picture this time. I have a band in the middle but most of it is hidden out of the patterned paper.

Nu kommer en tutorial på hur jag gör mina te- och ljuskort.
Börja med att skära till en cardstock i storleken 30*18 cm. Denna bit kommer att bilda asken.
Biga längst de längre sidorna vid 1 cm och 3 cm från båda kanterna.
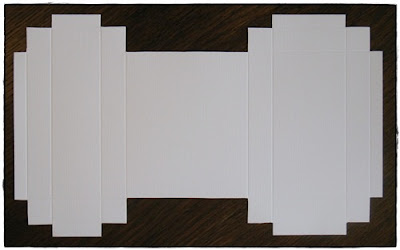
Längst den korta sidan ska ni biga enligt följande: 1, 3, 7, 9, 19, 21, 27 och 29. Det bör se ut så här när ni är klara...
Now, a tutorial on how I make my tea and light card.
Start by cutting a cardstock in size 30 * 18 cm. This bit will form the box.
Crease at the longer sides of 1 cm and 3 cm from both edges.
At the short side are you biga as follows: 1, 3, 7, 9, 19, 21, 27 and 29. It should look like this when you're done ...


Lägg nu bort asken en liten stund, för nu ska vi göra kortstommen. Börja med att skära till en bit cardstock som är 12*22,3 cm. Biga vid 10 och 12,3 cm eller så kan ni biga vid 10 cm från båda hållen.
Now put away the box a little while, for now we'll do a short frame. Start by cutting a piece of cardstock that is 12 * 22.3 cm. Biga at 10 and 12.3 cm, or you can biga at 10 cm from both sides.

Innan jag gör något mer fäster jag ett band på framsidan och baksidan av kortstommen.
Before I do anything more, I attach a ribbon on the front and back of the card body.

Nu är det dags att klä kortstommens framsida och insida. Sedan drar jag bort skyddsplasten från tejpen på askens undersida och sätter fast asken på insidan av kortstommen. Som ni ser har jag lagt i tre värmeljus och dekorerat en liten tändsticksask med det mönstrade papper som jag valde till detta kort. Jag har även lagt i tre tepåsar.
Now it's time to dress kortstommens front and inside. Then I pull off the protective film from the tape on the bottom of the box and attach the box to the inside of the card body. As you can see, I have three candles and decorated a small matchbox with the patterned paper that I chose for this card. I have also put in three bags.

Jag knyter ihop bandet och dekorerar kortets framsida.
I tie together the band and decorate front of the card.
Jag hoppas att ni blev inspirerade till att göra ett eget te- och ljuskort. Om ni använder min tutorial blir jag glad om ni lämnar en kommentar så jag kan få just era kort. Lycka till!
I hope you were inspired to make your own tea light card. If you use my tutorial, I am glad if you leave a comment so I can get your specific card. Good Luck!
Med det här kortet deltar jag i följande utmaningar:
With this card I participate in the following challenges:
The Crazy Challange: #130 Handmade flowers
Whimsy Stamps Challange: #52 All things sparkly
Simon Says Stamp Challange: Dies and/or punches
Bearly-Mine Challange: #57 Anything goes
I've made a tea light card after the fine sketch Lotta designed to challenge # 53 at 100% North. I have used two turquoise details. A large turquoise bling stone in my home-made flower and a turquoise bead in my homemade pins. I took the liberty to make a really free interpretation this time. The three circles in the sketch is my flower with three layers. The text "hug" is from Stämpelkällan and I chose to move it down to the corner and the flower centers must meet the picture this time. I have a band in the middle but most of it is hidden out of the patterned paper.

Nu kommer en tutorial på hur jag gör mina te- och ljuskort.
Börja med att skära till en cardstock i storleken 30*18 cm. Denna bit kommer att bilda asken.
Biga längst de längre sidorna vid 1 cm och 3 cm från båda kanterna.
Längst den korta sidan ska ni biga enligt följande: 1, 3, 7, 9, 19, 21, 27 och 29. Det bör se ut så här när ni är klara...
Now, a tutorial on how I make my tea and light card.
Start by cutting a cardstock in size 30 * 18 cm. This bit will form the box.
Crease at the longer sides of 1 cm and 3 cm from both edges.
At the short side are you biga as follows: 1, 3, 7, 9, 19, 21, 27 and 29. It should look like this when you're done ...

Vi ska nu klippa bort vissa delar av cardstocken och det ni får kvar ser ut så här...
We will now cut out some parts of the card stock and you will still look like this ...
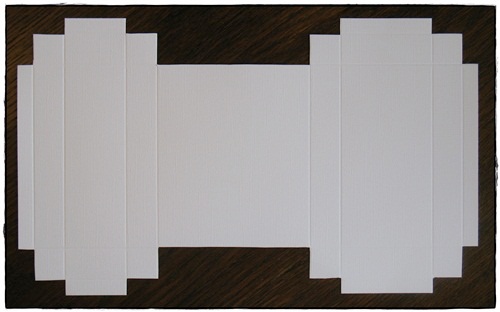
Ni ska nu klippa längst de svart linjerna, så ni bildar askarnas flikar.
You will now be cut at the black lines, so you forming cartons tabs.

Innan asken viks ihop brukar jag skära ut fönster så innehållet syns. Antingen lämnas fönsterna öppna, eller så kan använda något som fönsterglas, t ex gelatinblad eller overheadplast. Man kan skära fönsterna för hand med linjal och skalpell eller med hjälp av sin stansmaskin och välja en dies som passar. Jag har skurit ut mina fönster med linjal och skalpell, en cm från kanterna. På den bredare delen till höger har jag lämnat en mellanrum på 1,5 cm eftersom den asken rymmer både tändsticksask och tepåsar. På så vis blir det som en avdelar mellan askens olika innehåll. Sätt dubbelhäftande på hela mittersta delen och på kortsidorna där jag har markerat enligt bilden.
Before the box is folded, I cut out the windows so the contents are visible. Either left the windows open, or you can use something like window glass, for example, gelatin sheets or overhead plastic. You can cut the windows manually with a ruler and a scalpel or by means of its punching machine and select a suitable dies. I have cut out my window with a ruler and scalpel, one cm from the edges. On the wider part right, I have left a gap of 1.5 cm because the box holds both matches and tea bags. This will make it as a dividing between the box different content. Put adhesive on the middle part and the short sides where I have marked as shown.

För att underlätta när ni ska vika ihop asken är det bra att vika längst de bigade linjerna först. Jag brukar även dra en linje på insidan där askens olika delar ska fästa. Bara för att få det så rakt som möjligt.
For ease when to fold up the box, it is good to fold at the scored lines first. I usually also draw a line inside the box where the various parts to snap. Just to get it as straight as possible.

Vill man klä asken med mönstrat papper är det lättare att göra det nu innan askens sätts ihop. Dra bort den ena tejpbitens skyddsplast på någon av den högra kortsidan och fäst den längst den ritade linjen.
If you want to dress up box with patterned paper, it's easier to do it now before the box is assembled. Take away one tejpbitens protective plastic on one of the right short side and secure it at the drawn line.

Dra bort skyddsplasten på den andra kortsidans tejp och fäst den längst den ritade linjen.
Pull off the protective plastic on the other short side adhesive tape and attach it along the drawn line.

Sist men inte minst har vi en bit tejp kvar och det är den som sitter emellan askarna. Dra bort skyddsplasten och tejpa ihop askarna längst mitten. Om asken känns trög att stänga kan man klippa bort en del av lockets hörn, så som jag har gjort på bilden.
Last but not least, we have a piece of tape left and that is the one that sits in between the boxes. Pull off the protective plastic and tape the boxes at the center. If the box feels sluggish to close, you can cut out a portion of the cover corners, so I made the picture.

Now put away the box a little while, for now we'll do a short frame. Start by cutting a piece of cardstock that is 12 * 22.3 cm. Biga at 10 and 12.3 cm, or you can biga at 10 cm from both sides.

Innan jag gör något mer fäster jag ett band på framsidan och baksidan av kortstommen.
Before I do anything more, I attach a ribbon on the front and back of the card body.

Nu är det dags att klä kortstommens framsida och insida. Sedan drar jag bort skyddsplasten från tejpen på askens undersida och sätter fast asken på insidan av kortstommen. Som ni ser har jag lagt i tre värmeljus och dekorerat en liten tändsticksask med det mönstrade papper som jag valde till detta kort. Jag har även lagt i tre tepåsar.
Now it's time to dress kortstommens front and inside. Then I pull off the protective film from the tape on the bottom of the box and attach the box to the inside of the card body. As you can see, I have three candles and decorated a small matchbox with the patterned paper that I chose for this card. I have also put in three bags.

Jag knyter ihop bandet och dekorerar kortets framsida.
I tie together the band and decorate front of the card.
Jag hoppas att ni blev inspirerade till att göra ett eget te- och ljuskort. Om ni använder min tutorial blir jag glad om ni lämnar en kommentar så jag kan få just era kort. Lycka till!
I hope you were inspired to make your own tea light card. If you use my tutorial, I am glad if you leave a comment so I can get your specific card. Good Luck!
Med det här kortet deltar jag i följande utmaningar:
With this card I participate in the following challenges:
The Crazy Challange: #130 Handmade flowers
Whimsy Stamps Challange: #52 All things sparkly
Simon Says Stamp Challange: Dies and/or punches
Bearly-Mine Challange: #57 Anything goes


Fabulous project! I love the dimension of the flower and the pop of teal! Thanks for joining us for the Simon Says Stamp Challenge!
SvaraRaderaI love the blue accent and the lovely flower.
SvaraRaderaThanks for joining us at The Crazy Challenge!
Lovely box this is, well done! Thanks for joining us at The Crazy Challenge.
SvaraRaderagroetjes, Ellen
wow, Great Tutorial and your design is fantastic
SvaraRaderaWe would like to thank you for Entering Whimsy Stamps inspirations Challenge.
Hugs from Tammy Ortiz - DT Digi Team for Whimsy Stamps
WOWOWWOWOWOWOWOW! sensational!!!! love it!
SvaraRaderaThank you so much for sharing your wonderful project with us over at Whimsy for our Sparkle challenge.
xoxoxo Carly
Wow this is amazing... thank you so much for putting up a tutorial also... I love it, and something i will definately try myself. Thank you so much for sharing with us at Bearly Mine Challenges, this week. GDT
SvaraRaderaThank you so much for sharing with us at Bearly Mine Challenges, this week. Amazing, and thankyou for doing a tutorial also, something I will definately be trying myself. Gorgeous creation. GDT
SvaraRaderaSuper project and fabulous tutorial!! thanks for joining us at BMC this time
SvaraRaderahugs
laney
Dette var et flott enkelt og klassisk design!
SvaraRadera